


10.4 Other Aircraft Systems
10.4 기타 항공기 시스템
AIR BRAKES AND DIVE-BOMBING SYSTEMS:
에어 브레이크 및 다이빙 폭격 시스템:
Air brakes are used during dive-bombing attacks and keep your aircraft from building up too much speed. In IL-2 Sturmovik: Great Battles, the Ju 87 D-3, Ju 88 A-4, and all models of the Pe-2 are fitted with dive brakes.
에어 브레이크는 낙하 폭격 공격 시 사용되며 기체의 속도가 너무 빨라지는 것을 방지합니다. IL-2 스투르모비크: 위대한 전투에서는 Ju 87 D-3, Ju 88 A-4, Pe-2의 모든 기종에 다이브 브레이크가 장착되어 있습니다.
Additionally, the P-38 J-25 has a set of dive recovery flaps that delays the effects of compressibility and thus allows you to safely pull your plane out of a high-speed dive. To toggle the use of your air brakes, press the Right Alt + B key combination (AirBrakes on/off).
또한 P-38 J-25에는 압축성의 영향을 지연시켜 고속 다이빙에서 비행기를 안전하게 끌어낼 수 있는 다이빙 리커버리 플랩 세트가 있습니다. 에어 브레이크 사용을 전환하려면 오른쪽 Alt + B 키 조합(에어 브레이크 켜기/끄기)을 누르세요.
In addition to their air brakes, the Ju 87 D-3, Ju 88 A-4, and all models of the Pe-2 are fitted with a dive recovery system that is engaged when the dive brakes are extended. When engaged, this system trims the plane nose-heavy, thus causing the plane to enter a dive. This dive recovery system will disengage and re-trim your plane after you drop your bombs or retract your dive brakes. This dive recovery system can also be manually engaged and disengaged in the Ju 88 A-4 and all models of the Pe-2. To toggle the use of this dive recovery system, press the Left Ctrl + D key combination (Dive recovery system: on/off).
Ju 87 D-3, Ju 88 A-4 및 Pe-2의 모든 모델에는 에어 브레이크 외에도 다이브 브레이크가 확장될 때 작동하는 다이브 리커버리 시스템이 장착되어 있습니다. 이 시스템이 작동하면 비행기의 기수를 무겁게 조정하여 비행기가 다이빙에 들어갑니다. 이 다이빙 리커버리 시스템은 폭탄을 투하하거나 다이빙 브레이크를 접은 후에 해제되어 비행기를 다시 트림합니다. 이 다이빙 복구 시스템은 Ju 88 A-4 및 모든 Pe-2 기종에서 수동으로 작동 및 해제할 수 있습니다. 이 다이브 리커버리 시스템의 사용을 전환하려면 왼쪽 Ctrl + D 키 조합(다이브 리커버리 시스템: 켜기/끄기)을 누릅니다.
Note: In the Pe-2, your dive brakes must be extended before you can manually engage and disengage the dive recovery system.
참고: Pe-2에서는 다이빙 리커버리 시스템을 수동으로 작동 및 해제하기 전에 다이빙 브레이크를 연장해야 합니다.
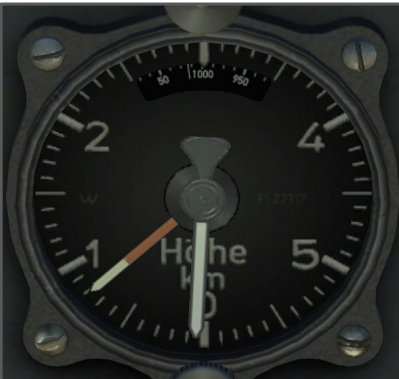
Additionally, the Ju 87 D-3 and Ju 88 A-4 feature a special device called a contact altimeter. This sort of altimeter lets you know when to drop your bombs during a dive-bombing attack. To set up the contact altimeter, press the Right Shift + K key combination (Contact altimeter: target altitude increase) to increase the desired bomb drop altitude and the Right Ctrl + K key combination (Contact altimeter: target altitude decrease) to decrease the desired bomb drop altitude. On the contact altimeter, the red and white needle indicates the set contact altitude.
또한 Ju 87 D-3과 Ju 88 A-4에는 접촉 고도계라는 특수 장치가 있습니다. 이 고도계는 폭탄 투하 공격 시 폭탄 투하 시기를 알려줍니다. 접촉 고도계를 설정하려면, 원하는 폭탄 투하 고도를 높이려면 오른쪽 Shift + K 키 조합(접촉 고도계: 목표 고도 증가)을 누르고, 원하는 폭탄 투하 고도를 낮추려면 오른쪽 Ctrl + K 키 조합(접촉 고도계: 목표 고도 감소)을 누릅니다. 접촉 고도계에서 빨간색과 흰색 바늘은 설정된 접촉 고도를 나타냅니다.
For the contact altimeter to work correctly, you need to have your dive recovery system engaged. Your dive recovery system is automatically engaged when the dive brakes are extended or (when flying the Ju 88 A-4), you engage the dive recovery system manually without dive brakes with the Left Ctrl + D key combination (Dive recovery system: on/off). A buzzer will then sound when you are 250 meters above your desired bomb drop altitude. This buzzer will shut off when the desired bomb drop altitude is reached or when the dive recovery system is disengaged.
접촉 고도계가 올바르게 작동하려면 다이빙 리커버리 시스템을 작동시켜야 합니다. 다이브 브레이크가 연장되면 다이브 리커버리 시스템이 자동으로 작동하거나 (Ju 88 A-4 비행 시) 다이브 브레이크 없이 왼쪽 Ctrl + D 키 조합(다이브 리커버리 시스템: 켜기/끄기)으로 다이브 리커버리 시스템을 수동으로 작동할 수 있습니다. 그러면 원하는 폭탄 투하 고도인 250미터 상공에 도달하면 부저가 울립니다. 원하는 폭탄 투하 고도에 도달하거나 다이빙 복구 시스템이 해제되면 이 버저는 꺼집니다.
JU 87 D-3 DIVE BOMBING TUTORIAL VIDEO GUIDE
JU 87 D-3 다이빙 폭파 튜토리얼 비디오 가이드
https://www.youtube.com/embed/CZK65tb2qIU?feature=oembed
JU 88 A-4 DIVE BOMBING TUTORIAL VIDEO GUIDE
주 88 A-4 다이빙 폭격 튜토리얼 비디오 가이드
https://www.youtube.com/embed/65Jw-CkRq3w?feature=oembed
While the Ju 87 D-3 does not have a bomb bay, it has a floor-mounted window that can be opened with the N key (Bomb bay doors toggle). Opening this window will afford you a better view of the ground and allow you to acquire your ground targets more easily.
Ju 87 D-3에는 폭탄창이 없지만, 바닥에 장착된 창이 있으며 N키(폭탄창 문 토글)로 열 수 있습니다. 이 창을 열면 지상을 더 잘 볼 수 있고 지상 목표물을 더 쉽게 획득할 수 있습니다.
Finally, a special feature of the Ju-87 D-3 is its landing gear-mounted “Jericho Trumpet” dive sirens. Powered by wind-driven generators, these sirens were historically intended to be a psychological weapon that would terrify enemy troops on the ground. In IL-2: Great Battles, these sirens have no practical effect on the enemy (other than slightly slowing your plane down due to increased drag). To toggle these sirens on and off, press the Left Alt + S key combination (Attack Siren on/off).
마지막으로 Ju-87 D-3의 특별한 특징은 랜딩기어에 장착된 “제리코 트럼펫” 다이빙 사이렌입니다. 풍력 발전기로 구동되는 이 사이렌은 역사적으로 지상의 적군을 겁에 질리게 하는 심리적 무기로 사용되었습니다. IL-2: 그레이트 배틀에서 이 사이렌은 항력 증가로 인해 비행기의 속도를 약간 늦추는 것 외에는 적에게 실질적인 영향을 미치지 않습니다. 사이렌을 켜고 끄려면 왼쪽 Alt + S 키 조합(공격 사이렌 켜기/끄기)을 누르세요.
ALTIMETER:
ALTIMETER:
You can adjust your altimeter in all aircraft between two different readings: standard atmospheric pressure (QNE) and home airfield elevation (QFE). The former setting shows your altitude at 1013.25 hPa (29.92 in Hg) Standard Pressure, while the latter will show your altitude above your home airfield. This latter setting is especially helpful when landing your aircraft. To adjust your altimeter’s readout, press the Left Alt + A key combination (Altimeter reference pressure toggle).
모든 항공기에서 고도계는 표준 대기압(QNE)과 홈 비행장 고도(QFE)의 두 가지 수치 사이에서 조정할 수 있습니다. 전자의 설정은 1013.25기압(29.92기압)의 표준 기압으로 고도를 표시하고, 후자의 설정은 홈 비행장 위의 고도를 표시합니다. 후자의 설정은 항공기 착륙 시 특히 유용합니다. 고도계의 판독값을 조정하려면 왼쪽 Alt + A 키 조합(고도계 기준 압력 토글)을 누릅니다.
Note: In the bombsight view (discussed in more detail in Section 12.7), the altimeter is always set to standard atmospheric pressure.
참고: 폭격 보기(12.7절에서 자세히 설명)에서 고도계는 항상 표준 대기압으로 설정됩니다.
AUTOPILOT:
오토파일럿:
You can toggle an auto-leveling autopilot with the Left Shift + A key combination (AI-autopilot for level flight: on/off). With this autopilot system engaged, the aircraft will maintain its current altitude and heading, provided that your engines are providing enough power (if they are not, the autopilot system will disengage). While this autopilot system is engaged, you can adjust your course heading to the left with the Left Shift + Z key combination (Level flight AI-autopilot: left turn) and to the right with the Left Shift + X key combination (Level flight AI-autopilot: right turn).
자동 수평 조절 오토파일럿은 왼쪽 시프트 + A 키 조합으로 전환할 수 있습니다(수평 비행용 AI 오토파일럿: 켜기/끄기). 이 오토파일럿 시스템이 활성화되면 엔진이 충분한 출력을 공급하는 경우 항공기는 현재 고도와 방향을 유지합니다(그렇지 않은 경우 오토파일럿 시스템이 해제됩니다). 이 자동 조종 시스템이 작동하는 동안에는 왼쪽 시프트 + Z 키 조합으로 왼쪽으로(레벨 비행 AI-자동 조종: 좌회전), 왼쪽 시프트 + X 키 조합으로 오른쪽으로(레벨 비행 AI-자동 조종: 우회전) 코스 방향을 조정할 수 있습니다.
Please note that this autopilot system is purely for maintaining level flight. It will not engage enemy aircraft or operate any controls other than the control surfaces to maintain level flight. If you want the game to fly your plane without any input from you, first enable the Autopilot option from the Realism settings screen and then press the A button (AI-autopilot on/off).
이 자동 조종 시스템은 순전히 수평 비행을 유지하기 위한 것입니다. 평평한 비행을 유지하기 위해 적기와 교전하거나 조종면 이외의 다른 컨트롤을 조작하지 않습니다. 게임에서 사용자의 입력 없이 비행기를 비행하게 하려면 먼저 리얼리즘 설정 화면에서 자동 조종 옵션을 활성화한 다음 A 버튼(AI 자동 조종 장치 켜기/끄기)을 누르세요.
CANOPY:
캐노피:
To open and close your aircraft’s canopy, press the Right Alt + C key combination (Canopy open/close). While opening your canopy will improve your visibility, be aware it will slow down your plane (due to increased drag) and, in some cases it will cause the canopy to be ripped off while in flight! Some aircraft will require you to slow down before attempting to open the canopy to bail out as they are not fitted with an emergency release system. Also, some multi-crew aircraft have gun turrets that need to have their canopy closed for the guns to be usable. In such cases, all the canopies fitted to the plane will open and close at the same time.
기체의 캐노피를 열고 닫으려면 오른쪽 Alt + C 키 조합(캐노피 열기/닫기)을 누르세요. 캐노피를 열면 가시성이 향상되지만, 항력 증가로 인해 비행 속도가 느려지고 경우에 따라 비행 중 캐노피가 찢어질 수 있다는 점에 유의하세요! 일부 항공기는 비상 탈출 시스템이 장착되어 있지 않기 때문에 캐노피를 열기 전에 속도를 줄인 후 탈출을 시도해야 합니다. 또한 일부 다중 승무원 항공기의 포탑에는 캐노피를 닫아야만 포를 사용할 수 있는 포탑이 있습니다. 이러한 경우 비행기에 장착된 모든 캐노피가 동시에 열리고 닫힙니다.
LIGHTING:
조명:
Most aircraft in IL-2: Great Battles and Flying Circus are fitted with cockpit lighting. In some planes, these lights are no more than simple cockpit lamps, while other aircraft also feature illuminated instruments. Pressing the L key (Cockpit light on/off) will cycle through all the cockpit lighting options with which your aircraft is fitted.
IL-2: 위대한 전투와 플라잉 서커스에 등장하는 대부분의 항공기에는 조종석 조명이 장착되어 있습니다. 일부 기종에서는 단순한 조종석 램프에 불과한 조명도 있지만, 다른 기종에는 조명이 켜진 계기판도 있습니다. L 키(조종석 조명 켜기/끄기)를 누르면 해당 항공기에 장착된 모든 조종석 조명 옵션이 순환됩니다.
Note: In low-light conditions, many instruments will automatically glow in the dark. This is a simulation of the radioactive paint that was applied to these instruments.
참고: 저조도 환경에서는 많은 기기가 어두운 곳에서 자동으로 빛을 발합니다. 이것은 이러한 기기에 적용된 방사성 페인트의 시뮬레이션입니다.
In addition to the standard cockpit lighting, all IL-2 Sturmovik: Great Battles are fitted with a set of navigation lights. Press the Right Ctrl + L key combination (Navigation lights on/off) to toggle this lighting on and off.
모든 IL-2 스터모빅에는 기본 조종석 조명 외에도: 위대한 전투에는 내비게이션 조명 세트가 장착되어 있습니다. 이 조명을 켜고 끄려면 오른쪽 Ctrl + L 키 조합(내비게이션 조명 켜기/끄기)을 누르세요.
Most aircraft in IL-2 Sturmovik: Great Battles are fitted with either a fixed or retractable landing light in their port wing. This light is helpful when landing and taxying in low-light conditions. Press the Right Shift + L key combination (Landing lights on/off) to toggle this lighting on and off.
IL-2 스터모빅의 대부분의 기체: 그레이트 배틀에는 좌현 날개에 고정식 또는 접이식 랜딩 라이트가 장착되어 있습니다. 이 조명은 저조도 환경에서 착륙 및 착륙할 때 유용합니다. 이 조명을 켜고 끄려면 오른쪽 Shift + L 키 조합(착륙등 켜기/끄기)을 누르세요.
Finally, some IL-2 Sturmovik: Great Battles aircraft are fitted with formation lights. These lights are helpful when flying in formation in low visibility conditions and can also serve as a way of signaling other aircraft. These lights, which come in different color combinations, can be cycled through with the Right Alt + L key combination (Formation lights on/off).
마지막으로, IL-2 스터모빅: 그레이트 배틀 기체에는 대형 라이트가 장착되어 있습니다. 이 조명은 저시정 조건에서 대형을 이루어 비행할 때 유용하며 다른 항공기에 신호를 보내는 용도로도 사용할 수 있습니다. 다양한 색상 조합으로 제공되는 이 조명은 오른쪽 Alt + L 키 조합(포메이션 조명 켜기/끄기)으로 전환할 수 있습니다.
RADIO EQUIPMENT:
무선 장비:
Some aircraft in IL-2: Great Battles feature radios that allow you to switch radio frequencies and listen in on enemy radio messages transmitted by AI-controlled aircraft or make use of your radio navigation equipment. There are currently three radio frequencies you can choose from: Allies, Axis, and Compass. The Allies radio channel operates on 4.0 MHz; the Axis channel operates on 3.7 MHz, and the Compass channel operates on 570 kHz. To change your radio’s channel, press the Left Alt + C key combination (Switch radio channel (allies/enemies)).
IL-2: 위대한 전투의 일부 기체에는 무선 주파수를 전환하여 AI 조종 기체가 전송하는 적의 무선 메시지를 듣거나 무선 항법 장비를 사용할 수 있는 무전기가 있습니다. 현재 선택할 수 있는 무전 주파수는 아군, 추축군, 나침반의 세 가지입니다. 아군 무전기 채널은 4.0MHz에서 작동하고, 축 채널은 3.7MHz에서, 나침반 채널은 570kHz에서 작동합니다. 무전 채널을 변경하려면 왼쪽 Alt + C 키 조합(무전 채널 전환(아군/적군))을 누르세요.
By default, your plane’s radio receiver is at 100% volume when you start a mission. If you want to change this, press the Left Alt + Numpad Subtract key combination (Radio receiver volume: decrease) to decrease the radio’s volume, or press the Left Alt + Numpad Add key combination (Radio receiver volume: increase) to increase the radio’s volume.
기본적으로 임무를 시작할 때 비행기의 라디오 수신기는 100% 볼륨으로 설정되어 있습니다. 이를 변경하려면 왼쪽 Alt + 숫자패드 빼기 키 조합(무전기 볼륨: 감소)을 눌러 무전기의 볼륨을 줄이거나 왼쪽 Alt + 숫자패드 더하기 키 조합(무전기 볼륨: 증가)을 눌러 무전기의 볼륨을 높이세요.
Additionally, some aircraft are fitted with radio navigation systems that indicate the direction (and in German planes, also the distance) to the nearest radio beacon. In most planes, these radio navigation systems are always on, but in other planes, you will need to tune your radio receiver to the Compass radio channel for the radio navigation equipment to work. Please see the IL-2 Sturmovik: Great Battles aircraft guides for specific details about these radio navigation systems.
또한 일부 항공기에는 가장 가까운 라디오 비콘까지의 방향(독일 항공기의 경우 거리도 표시)을 알려주는 라디오 내비게이션 시스템이 장착되어 있습니다. 대부분의 비행기에서는 이러한 라디오 내비게이션 시스템이 항상 켜져 있지만, 다른 비행기에서는 라디오 수신기를 컴퍼스 라디오 채널에 맞춰야 라디오 내비게이션 장비가 작동합니다. IL-2 스터모빅을 참조하세요: 위대한 전투 항공기 가이드에서 이러한 라디오 내비게이션 시스템에 대한 자세한 내용을 확인하세요.
Radio beacons are always present at your home airfield in Quick Mission mode. In Career Mode, radio beacons are always present at your home airfield, as well as your destination airfield in squadron relocation and cargo delivery missions. In other modes of gameplay, check the mission briefing notes to see if the mission’s designer has included radio beacons.
빠른 임무 모드에서는 무선 비콘이 항상 고향 비행장에 존재합니다. 커리어 모드에서는 편대 재배치 및 화물 수송 임무의 목적지 비행장뿐만 아니라 고향 비행장에도 항상 라디오 비콘이 존재합니다. 다른 게임 플레이 모드에서는 임무 브리핑 노트에서 임무 설계자가 라디오 비콘을 포함했는지 확인하십시오.
Note: All the radio navigation systems have a limited range, so they will not function properly if your plane is too far away from any given radio beacon.
참고: 모든 라디오 내비게이션 시스템은 수신 범위가 제한되어 있으므로 비행기가 특정 라디오 비콘에서 너무 멀리 떨어져 있으면 제대로 작동하지 않습니다.
The behavior of the radio direction equipment depends on the type of plane you are flying.
무선 방향 장비의 동작은 비행 중인 비행기 기종에 따라 다릅니다.

